


1. Yêu cầu
2. Mô hình

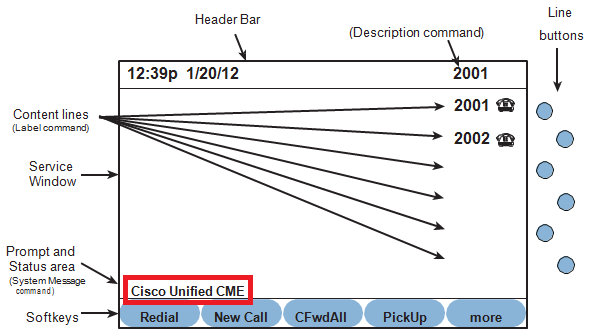
Hình 1.1
3. Mô tả lab
Các thiết bị đã được lắp đặt và được nối bằng cáp FastEthernet.
Bước 1: Gán địa chỉ
Sử dụng địa chỉ theo như mô hình, gán địa chỉ IP cho các cổng f0/0.10 và f0/0.20 của Router CME.
Cấu hình router CME:
hostname CME
interface f0/0
description Ket noi toi switch PoE
no ip address
no shutdown
exit
interface f0/0.1
description Ket noi toi Management VLAN
encapsulation dot1q 1 native
ip address 10.1.1.254 255.255.255.0
exit
interface f0/0.10
description Ket noi toi Voice VLAN
encapsulation dot1q 10
ip address 10.1.10.254 255.255.255.0
exit
interface f0/0.20
description Ket noi toi Data VLAN
encapsulation dot1q 20
ip address 10.1.20.254 255.255.255.0
exit
line vty 0 4
privilege level 15
no login
exit
line console 0
logging synchronous
exit
no ip domain-lookup
Cấu hình switch PoE:
hostname PoE
interface vlan 1
description Dat IP quan ly cho switch
ip address 10.1.1.253 255.255.255.0
no shutdown
exit
interface f0/24
description Ket noi toi router CME
switchport trunk encapsulation dot1q
switchport mode trunk
exit
vlan 10
exit
vlan 20
exit
interface f0/1
description Ket noi toi IP Phone 1001
switchport mode access
switchport access vlan 20
switchport voice vlan 10
spanning-tree portfast
exit
interface f0/2
description Ket noi toi IP Phone 1002
switchport mode access
switchport access vlan 20
switchport voice vlan 10
spanning-tree portfast
exit
interface f0/3
description Ket noi toi IP Phone CIPC 1003
switchport mode access
switchport access vlan 10
spanning-tree portfast
exit
line vty 0 4
privilege level 15
no login
exit
line console 0
logging synchronous
exit
no ip domain-lookup
Bước 2: Cấu hình dịch vụ DHCP trên router CME
Trên router CME, khởi tạo 2 dải DHCP Pool để cấp IP:
ip dhcp excluded-address 10.1.10.254
ip dhcp pool Voice
network 10.1.10.0 255.255.255.0
default-router 10.1.10.254
option 150 ip 10.1.10.254
exit
ip dhcp excluded-address 10.1.20.254
ip dhcp pool Data
network 10.1.20.0 255.255.255.0
default-router 10.1.20.254
exit
Bước 3: Cấu hình dịch vụ “telephony-service” trên router CME
Tiến hành cấu hình dịch vụ “telephony-service” cấp số điện thoại xuống cho các IP Phone tương ứng như trong sơ đồ.
Mỗi DN (directory number) sẽ tiêu tốn tài nguyên xử lý của CME, nên chỉ cần thiết lập vừa đủ số lượng DN vừa đủ trong câu lệnh “max-dn x” vì sau này chúng ta có thể thay đổi được tham số này mà không làm ảnh hưởng hay gián đoạn đến hoạt động của hệ thống.
Sau khi chúng ta thay đổi các thiết lập ở Telephony Services section mà vẫn chưa có tác động tới các IP Phone, ta thực hiện câu lệnh “no create cnf-files” rồi thực hiện câu lệnh “create cnf-files” để khởi tạo lại các “template file” sẽ giúp giải quyết được vấn đề.
clock set 6:30:00 13 May 2015
configure terminal
telephony-service
ip source-address 10.1.10.254 port 2000
max-dn 144
max-ephones 42
create cnf-files
no auto-reg-ephone
exit
ephone-dn 1 dual-line
number 1001
exit
ephone-dn 2 dual-line
number 1002
exit
ephone-dn 3 dual-line
number 1003
exit
ephone 1
mac-address b000.b4d8.8e95
type 7965
button 1:1
codec g711ulaw
restart
exit
ephone 2
mac-address b000.b4d9.a3b1
type 7965
button 1:2
codec g711ulaw
restart
exit
ephone 3
mac-address 24b6.fd47.139e
type CIPC
button 1:3
codec g711ulaw
restart
exit
Có nhiều option liên kết với ephone-dn trong câu lệnh “button”, option thường được sử dụng nhiều nhất là “:”, sử dụng tùy chọn “?” để biết thêm nhiều option khác.
CME(config-ephone)#button ?
LINE button-index:dn-index pairs example 1:2 2:5
Configuration line:button with separator feature options:
: normal phone lines
example button 1:2 2:5
s silent ring, ringer muted, call waiting beep muted
example button 1s2 2s5
b silent ring, ringer muted, call waiting beep not muted
example button 1b2 2b5
f feature ring
example button 1f2 2f5
see also 'no dnd feature-ring'
m monitor line, silent ring, call waiting display suppressed
example button 1m2 2m5
see also 'transfer-system full-consult dss'
w watch line (BLF), watch the phone offhook status via the phone's primary
ephone-dn
example button 1w2 2w5
o overlay lines, combine multiple lines per physical button
example button 1o2,3,4,5
c overlay call-waiting, combine multiple lines per physical button
example button 1c2,3,4,5
see also 'huntstop channel' for ephone-dn dual-line
x expansion/overflow, define additional expansion lines that are
used when the primary line for an overlay button is
occupied by an active call
Expansion works with 'button o' and not with 'button c'
example button 4o21,22,23,24,25
button 5x4
button 6x4
Different separator options may be use for each button
example button 1:2 2s5 3b7 4f9 5m22 6w10
CME(config-ephone)#button
Bước 4: Khảo sát Config File trên CME và kiểm tra thông tin các IP Phone đã tiến hành đăng ký tới CME
Sau khi IP Phone khởi động, nó sẽ sử dụng thông tin Option 150 để móc nối tới TFTP server để lấy file SEP.cnf.xml. Nếu TFTP server không có file trên, IP Phone sẽ yêu cầu lấy về file XMLDefault.cnf.xml. Để quan sát các Config File, ta thực hiện câu lệnh “show telephony-service tftp-bindings”.
CME#show telephony-service tftp-bindings
tftp-server system:/its/SEPDEFAULT.cnf alias SEPDefault.cnf
tftp-server system:/its/vrf1/XMLDefault7965.cnf.xml alias SEPB000B4D88E95.cnf.xml
tftp-server system:/its/vrf1/XMLDefault7965.cnf.xml alias SEPB000B4D9A3B1.cnf.xml
CME#
Kiểm tra thông tin các IP Phone đã tiến hành đăng ký tới CME
CME#show ephone registered detail
ephone-1[0] Mac:B000.B4D8.8E95 TCP socket:[2] activeLine:0 whisperLine:0 REGISTERED in SCCP ver 22/17 max_streams=5
mediaActive:0 whisper_mediaActive:0 startMedia:0 offhook:0 ringing:0 reset:0 reset_sent:0 paging 0 debug:0 caps:9
IP:10.1.10.2 * 49170 7965 keepalive 164 max_line 6 available_line 6
using default button layout
button-layout 1: line button 1: cw:1 ccw:(0 0)
dn 1 number 1001 CH1 IDLE CH2 IDLE
Preferred Codec: g711ulaw
Lpcor Type: none
ephone-2[1] Mac:B000.B4D9.A3B1 TCP socket:[1] activeLine:0 whisperLine:0 REGISTERED in SCCP ver 22/17 max_streams=5
mediaActive:0 whisper_mediaActive:0 startMedia:0 offhook:0 ringing:0 reset:0 reset_sent:0 paging 0 debug:0 caps:9
IP:10.1.10.1 * 49170 7965 keepalive 165 max_line 6 available_line 6
using default button layout
button-layout 1: line button 1: cw:1 ccw:(0 0)
dn 2 number 1002 CH1 IDLE CH2 IDLE
Preferred Codec: g711ulaw
Lpcor Type: none
ephone-3[2] Mac:24B6.FD47.139E TCP socket:[3] activeLine:0 whisperLine:0 REGISTERED in SCCP ver 20/17 max_streams=5
mediaActive:0 whisper_mediaActive:0 startMedia:0 offhook:0 ringing:0 reset:0 reset_sent:0 paging 0 debug:0 caps:11
IP:10.1.10.3 * 54237 CIPC keepalive 15 max_line 8 available_line 8
using default button layout
button-layout 1: line button 1: cw:1 ccw:(0 0)
dn 3 number 1003 CH1 IDLE CH2 IDLE
Preferred Codec: g711ulaw
Lpcor Type: none
CME#
Trong quá trình các IP Phone đang tìm cách “register” tới CME, ta có thể thực hiện câu lệnh sau để kiểm tra.
CME# show ephone attempted-registrations
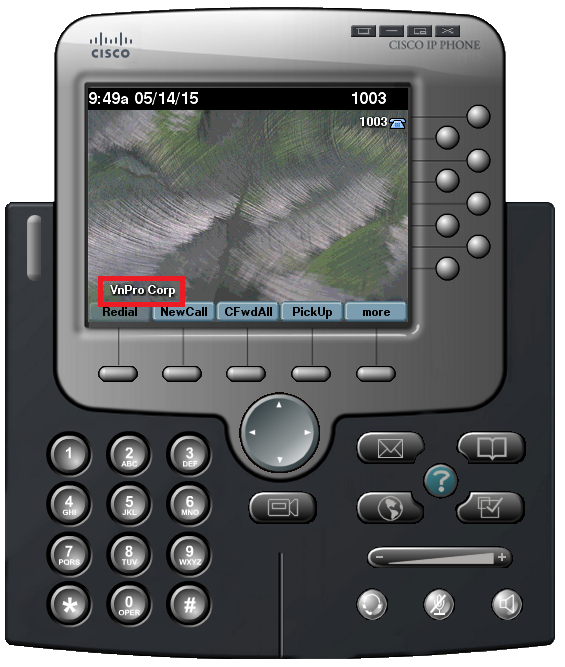
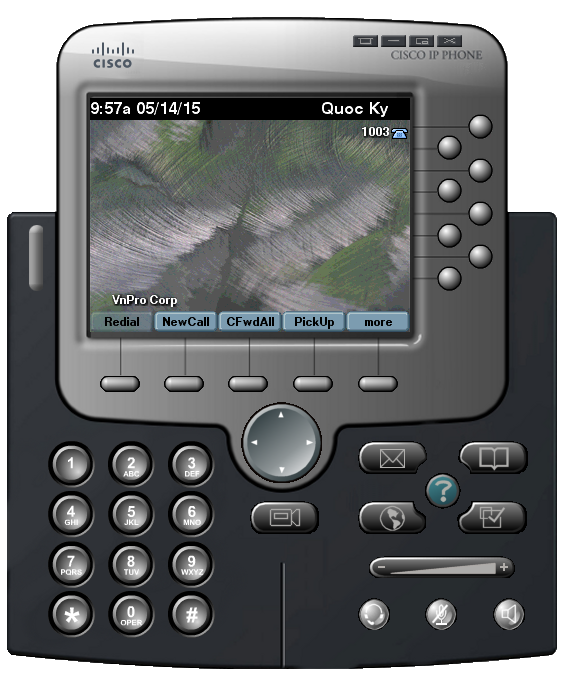
Bước 5: Cấu hình Banner Message hiển thị trên IP Phone
Giao diện hiển thị Cisco Unified IP Phone
Tất cả các IP Phone đều hiển thị message mặc định là “Cisco Unified CME”, để thay đổi message hiển thị mặc định này thành “VnPro Corp”, ta thực hiện câu lệnh “system message VnPro Corp”. Tiếp tục thực hiện câu lệnh “no create cnf-files” rồi thực hiện câu lệnh “create cnf-files” để áp dụng thiết lập ngay lập tức.
CME(config)#telephony-service
CME(config-telephony)#system message ?
LINE system message string
CME(config-telephony)#system message VnPro Corp
CME(config-telephony)#no create cnf-files
CNF files deleted
CME(config-telephony)#create cnf-files
Creating CNF files
CME(config-telephony)#exit
CME(config)#
Kết quả sau khi hiệu chỉnh
Bước 6: Thay đổi Phone Display Header Bar
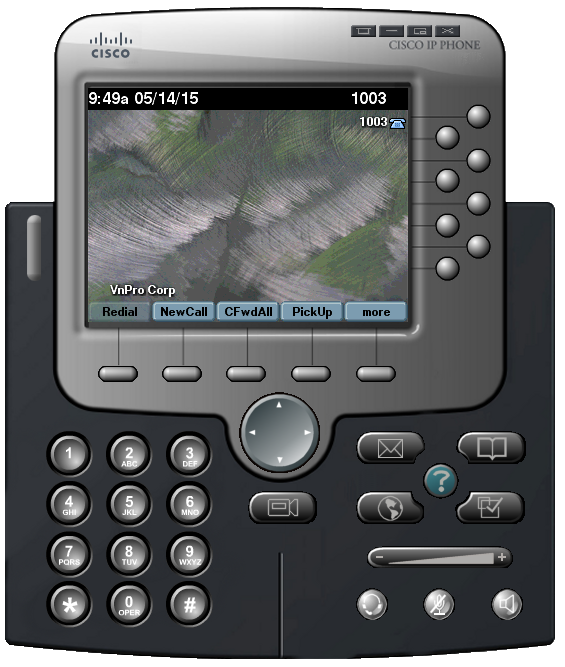
Phone Display Header Bar trước khi hiệu chỉnh
Để thay đổi “Phone Display Header Bar” ta thực hiện câu lệnh “description Quoc Ky”.
CME(config)#ephone-dn 3
CME(config-ephone-dn)#description ?
LINE description, will go on top black bar on 7960/40 and 797x display.
Max string length is 30. If string length is more than 14, only the last
14 characters are displayed on 7960/40 display. For 797x, all characters
are displayed with time and date alternately, each for 5 seconds.
Note, the actual display behavior may vary depending on the phone load.
CME(config-ephone-dn)#description Quoc Ky
CME(config-ephone-dn)#exit
CME(config)#ephone 3
CME(config-ephone)#restart
restarting 24B6.FD47.139E
CME(config-ephone)#
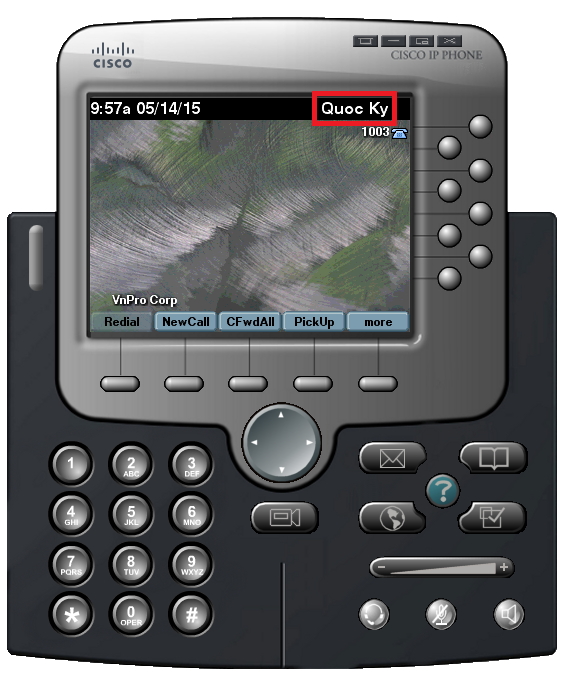
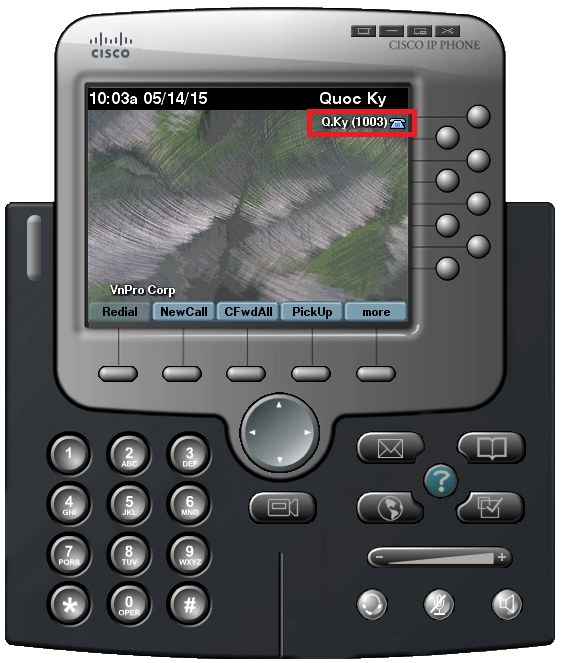
Phone Display Header Bar sau khi hiệu chỉnh
Bước 7: Thay đổi Text tương ứng với mỗi Line Button
Line Button trước khi hiệu chỉnh
Để thay đổi “Line Button” ta thực hiện câu lệnh “label Q.Ky (1003)”.
CME(config)#ephone-dn 3
CME(config-ephone-dn)#label Q.Ky (1003)
CME(config-ephone-dn)#exit
CME(config)#ephone 3
CME(config-ephone)#restart
restarting 24B6.FD47.139E
CME(config-ephone)#exit
CME(config)#
Line Button sau khi hiệu chỉnh
Cấu hình tổng kết thay đổi nhãn label cho “Line Button” của tất cả các IP Phone hiện có.
ephone-dn 1 dual-line
! number 1001
label Q.Ky (1001)
exit
ephone-dn 2 dual-line
! number 1002
label Q.Ky (1002)
exit
ephone-dn 3 dual-line
! number 1003
label Q.Ky (1003)
exit
ephone 1
restart
exit
ephone 2
restart
exit
ephone 3
restart
exit
Bước 8: Cấu hình dịch vụ danh bạ Phone Directory trên CME
Có 2 cách để add names vào CUCME user directory:
ephone-dn 1 dual-line
! number 1001
label Q.Ky (1001)
name Q.Ky (1001)
exit
ephone-dn 2 dual-line
! number 1002
label Q.Ky (1002)
name Q.Ky (1002)
exit
ephone-dn 3 dual-line
! number 1003
label Q.Ky (1003)
name Q.Ky (1003)
exit
ephone 1
restart
exit
ephone 2
restart
exit
ephone 3
restart
exit
CME(config)# telephony-service
CME(config-telephony)# directory entry ?
<1-250> Directory entry tag
clear clear all directory entries
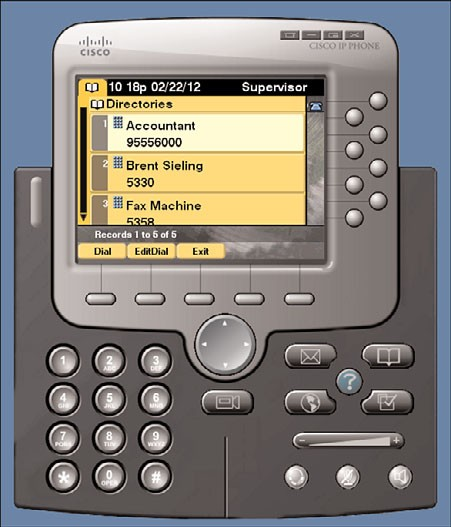
CME(config-telephony)# directory entry 1 5358 name Fax Machine
CME(config-telephony)# directory entry 2 95556000 name Accountant
Hoặc
telephony-service
directory entry 1 1001 name Q.Ky (1001)
directory entry 2 1002 name Q.Ky (1002)
directory entry 3 1003 name Q.Ky (1003)
exit
Để kích hoạt dịch vụ Local Directory cho phép hiển thị danh sách danh bạ trên Phone Display, ta cần cấu hình đủ 3 thông tin sau:
Directory trên phone sử dụng http để giao tiếp với router lấy thông tin directory information, để kích hoạt dịch vụ HTTP server trên router ta thực hiện câu lệnh sau.
CME(config)# ip http server
Khai báo model type
ephone 1
type 7965
exit
ephone 2
type 7965
exit
ephone 3
type CIPC
exit
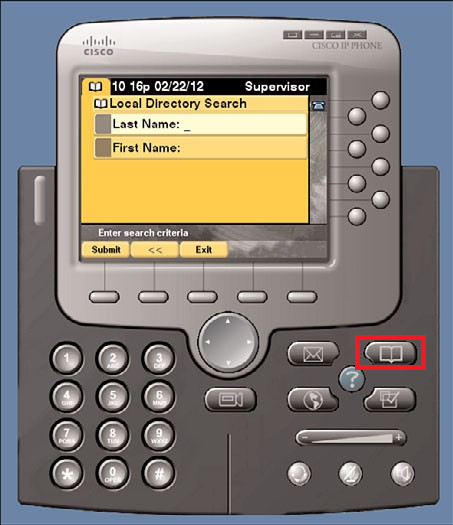
Nhấn vào nút Directories để truy cập dịch vụ Local Directory.
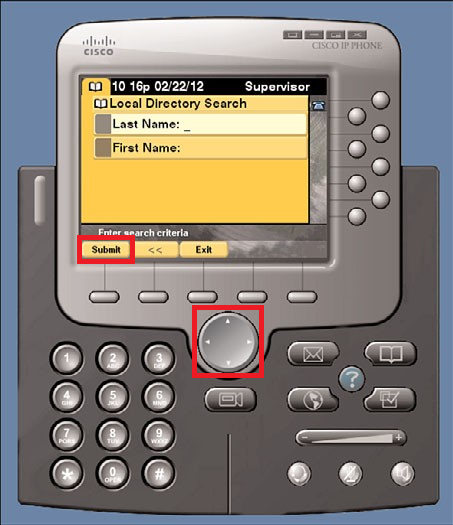
Nhấn Submit softkey để hiển thị 32 directory entry đầu tiên, sử dụng nút navigation buttons để lựa chọn Local Directory tương ứng.
Chúng ta có thể sử dụng keypad của phone để search số điện thoại dn dựa vào các kí tự đầu tiên của first name hoặc last name. Trên IP Communicator soft phone, ta có thể sử dụng keyboard của PC để gõ tên name.
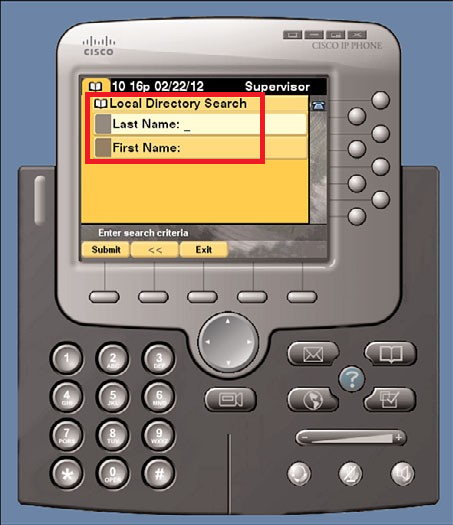
Local CUCME Directory có dạng như sau.
Bước 9: Cấu hình tính năng chuyển hướng cuộc gọi Call Forwarding trên CME
Tính năng chuyển hướng cuộc gọi Call Forwarding có thể được thực hiện bằng cách sử dụng giao diện hiển thị phone display trên IP Phone, hoặc có thể chuyển hướng tự động nếu người dùng ở trạng thái bận busy bằng cách cấu hình trên CME.
Cisco IP Phones có một softkey trên giao diện phone display cho phép chuyển hướng cuộc gọi calls tới một số dn number khác. Phone user chỉ cần nhấn vào CFwdAll softkey trên màn hình hiển thị display, dials tới extension mà cuộc gọi calls sẽ được forward tới, nhấn tiếp EndCall softkey để kích hoạt tác vụ chuyển hướng cuộc gọi.
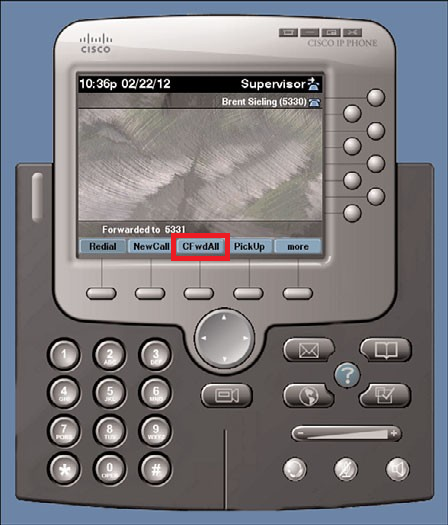
Khi tính năng chuyển hướng cuộc gọi forwarding được kích hoạt (active), tất cả các cuộc gọi tới extension sẽ không phát tín hiệu ring trên phone hiện tại, mà sẽ được chuyển hướng hết tới extension chỉ định trước đó. Để hủy bỏ (cancel) tính năng call forwarding, nhấn nút CFwdAll key thêm lần nữa.
Để chuyển hướng cuộc gọi tự động nếu người dùng ở trạng thái bận busy, hoặc người dùng không bắt máy sau một số lần máy đổ chuông, ta cần cấu hình tính năng call forward trên CME bằng câu lệnh "call-forward command" với nhiều options khác nhau chẳn hạn như forwarding all calls hoặc forwarding calls automatically after hours, trong đó có 2 option phổ biến nhất là chuyển hướng cuộc gọi forwarding calls khi phone ở trạng thái busy và forwarding calls nếu như người dùng không bắt máy sau khoảng thời gian xác định trước (a set amount of time) với tùy chọn (call-forward noan) option sao cho cuộc gọi calls có thể được gửi tới voicemail, tổng đài viên operator, hoặc chuyển sang chế độ trả lời tự động auto- attendant.
Ta sẽ cấu hình để ephone-dn 1 sẽ chuyển hướng cuộc gọi forward calls tới extension x1003 khi ephone-dn ở trạng thái bận busy và khi ephone-dn không trả lời cuộc gọi sau 12 giây.
CME(config)# ephone-dn 1
CME(config-ephone-dn)# call-forward ?
all forward all calls
busy forward call on busy
max-length max number of digits allowed for CFwdAll from IP phone night-service forward call on activated night-service
noan forward call on no-answer
CME(config-ephone-dn)# call-forward busy 1003
CME(config-ephone-dn)# call-forward noan 1003 timeout 12
Để test tính năng call forward, từ IP Phone x1002 ta thực hiện cuộc gọi tới x1001, sau 3 lần IP Phone x1001 đổ chuông mà không có người bắt máy, cuộc gọi từ x1002 sẽ được chuyển tới IP Phone x1003.
Nếu có người gọi tới, trên Cisco IP Phones cứ mỗi 4 giây lại đổ chuông một lần, còn trên PSTN phone cứ mỗi 6 giây lại đổ chuông một lần. Nếu như chúng ta muốn chuyển cuộc gọi call forwarding sau 5 lần đổ chuông (ring) ta có thể chỉnh thời gian timeoute là 20 giây.
Thay vì call foward tới x1003, ta có thể thiết lập để chuyển cuộc gọi tới voicemail. Để thực hiện được tính năng forward khi người dùng ở trạng thái bận busy (call-forward busy), ta cần hiệu chỉnh ephone-dn sử dụng đặc tính dual-line để đưa cuộc gọi đến incoming call ở trạng thái call waiting. Cả 2 kênh channels ở chế độ dial-line đều được sử dụng khi sử dụng tùy chọn call-forward busy option.
Nếu ephone-dn 1 chuyển cuộc gọi forward tới ephone-dn 2. Nếu không có ai bắt máy tại ephone-dn2, ephone-dn 2 lại chuyển cuộc gọi cho ephone-dn 1, tại ephone-dn 1 cũng không có ai bắt máy, cuộc gọi đến incoming call chuyển chuyển lại cho ephone-dn 2, tiến trình này cứ lặp liên tục và vĩnh viễn trên hệ thống. Để giải quyết vấn đề này, ta có thể thực hiện câu lệnh "max-redirect command" ở chế độ telephony-service thiết lập số lần chuyển hướng redirect cuộc gọi trước khi cuộc gọi bị ngắt kết nối (disconnected).
telephony-service
max-redirect 5
Để kiểm tra giá trị "max-redirect", ta có thể thực hiện câu lệnh show telephony-service command.
CME# show telephony-service
CONFIG (Version=7.1)
=====================
Version 7.1
Cisco Unified Communications Manager Express
max-redirect 5
Link phần 2: https://vnpro.vn/thu-vien/lab-cme-cau-hinh-cme-cap-so-directory-number-cho-cac-ip-phone-phan-2-3489.html